Saturday, May 31, 2014

Decision Time

I gave myself until the end of May to decide whether the boat was going to go in the water or not.  I'm kicking myself now for not doing more over the winter.  There was a ton that I could have done in the warmth of my shop, but I guess I just needed a break.  Oh well, now it's crunch time and although there are a bunch of things on the list I don't think will make it, I've decided to launch this year, but not the way I had planned it. 

Originally, I was going to bring the boat down to the south coast of Massachusetts (Marion area), but in the 8 years that I've had the boat down there, the prices have gone up roughly 30%.  Couple that with the cost of hauling down there (~$1200-1500) and my already way over tapped restoration budget, I really had to rethink the launch date and possibly postpone it another year to spread costs.

So, just as I was wondering if this was going to be even remotely affordable, I found a mooring available for August and September in Center Harbor on Lake Winnipesaukee.  I had the boat on Winni the last year I had it in the water because it was close to where my dad was living and his health precluded him from traveling but he is the reason I'm a sailor and he was a sailor till the end and had his last sail on Magic 2 months before he died.

Lake Winnipesaukee is New Hampshire's largest lake with several hundred islands and roughly 20 miles by 10 miles wide.  Not the biggest body of water but it's only 30 minutes away which will make it much easier to swing up after work to get some work done or go out for an afternoon sail.  This is nearly impossible if I had the boat in Massachusetts.  Also, it will only cost about $1500 to haul, step, launch and keep the mooring as opposed to $3000+ down in Mass.   Finally, since I'm launching in late July instead of late June, I'll have an extra month to get stuff done.  I'd rather work out the inevitable kinks that the boat will throw at me close to home than far away.

As far as what needs to be done to get the boat in the water, there is still a lot of little things and 3 projects to do. Namely, the cockpit coamings, a tiller, and getting the engine started after 5 years of not running.  The coamings and tiller are on my list to start next week and shouldn't have any surprises.  The engine is still a bit of a mystery as to what I'll need to do, but I'm going to get going on that next week as well. 

Otherwise things are in good order and I crossed off another milestone today by installing the rudder permanently with the help of my son and wife.  I still have to glass over the bolt pocket now that it is installed, but after everything I've done, it's nothing.  I'm really pleased with the way it turned out and that the alignment was spot on perfect.  The shaft rides in the bearing as smooth as silk with no noticeable binding. 


Wednesday, May 28, 2014

Butyl-iful

Now that the Interlux Perfection is pretty much finished up and what is down in the cockpit needs to cure for a few days before I think about KiwiGrip, I had some time to get the big fixed port windows installed.  I had been working on cleaning them up last week while vegetating in front of the TV at night.  

Originally I was going to replace the plexiglass because they were pretty clouded, but I priced them at a local Portland Glass shop and they wanted $60 each.  I could have done it myself but I had a tough time sourcing 3/8" plexiglass that would ship for a reasonable price.  At this point I want (need) to save money because our bank account has been hemorrhaging cash lately.  A friend of mine suggested that I try some headlight restorer so I figured I'd take a gamble and spend $15 on a kit.  If it worked great, if not, it's not the end of the world.

The kits run the gamut from $5 - $30, but all basically do the same thing: sand with 1000 grit, then 1500 grit, then a rubbing compound.  Finally, the kit I chose came with a polish that is supposed to make it all shine.  The results?  Not too bad, in fact, good enough for this year.  Ultimately, I'll want to replace them because they certainly aren't perfect, but it did help quite a bit.  

I also spent some time cleaning up the frames for the windows.  I have seen some pretty cheap frames in other boats, but these are chromed bronze and other than a little pitting on the chrome, they are in good shape.  They would cost a fortune if I were to have them made.  I carefully chased all the threads and polished all the frames in addition to scraping off all the silicon sealant that was the last bedding material these windows used.  

I'm not a big fan of silicon, it generally fails quickly, but the residue is nearly impossible to remove. I decided to use butyl rubber because the opening portlights forward were bedded in butyl rubber and they never leaked.  When I removed them, the 45 year old butyl was just as soft and sticky as the day it went in.  Seems like a good combination, so I ordered a few roles from 'Maine Sail' at PBase.  It's high quality butyl tape that doesn't 'bleed' like some so-called butyl rubber.

To get started I put a strip of butyl tape around the entire opening of the window and pressed it into place.  Once it was nicely stuck to the cabin top, I rolled the outside edge onto itself (the photo to the right makes it clear).  Then I pressed the outside frame into the cut out and onto the butyl tape.

Moving to the inside, I took another strip of butyl tape and pressed it onto the perimeter of the plexiglass window.  Then it got a little tricky because I didn't have any help and I needed to press the window into the frame from the inside.  Because the outside frame was just pressed into place, I couldn't push too hard.  As a result, the butyl on the window wouldn't adhere to the frame so I had to hold it in place while I positioned the inner frame.  Once I got one screw in, it all came together though.  

Because the butyl was pretty thick, I used longer screws (first 1", then 3/4") to pull the frame tight because the correctly sized 5/8" screws wouldn't go all the way through to the threads on the outer frame.  That's the nature of butyl, it compresses down when under pressure, but it doesn't go without a bit of a fight.  It's also the reason it works so well at keeping out water.  

Once everything was tightened down, I trimmed excess that squeezed out the edges with an exact-o knife.  It was very satisfying and came off in a single long strip. All in all it took about 30 minutes per window once I got going.  It's really starting to look like a boat again.


Tuesday, May 27, 2014

So Very Weary...

I spent the bulk of the weekend in a car driving to and from a funeral in Delaware.  It was not your typical Memorial Day weekend peppered with barbecues, volleyball and general outdoor fun.  I got home yesterday mid afternoon and didn't really feel like doing anything but taking a nap, but I forced myself to get over to the boat and get something done.

The first order of business was sanding of course.  I'm sure I've said it before, but there always seems like more to do and the quest for perfection looks like an asymptote of a curve: you just never get there. Fortunately, I decided enough was enough and called it good.  I think that if I weren't so exhausted I would have continued sanding forever.

I wiped everything down with acetone and then the Interlux brushing reducer (2333n).  Then I mixed up the paint and went to town with my 4" foam roller.  Since the vast majority of the cockpit will be covered with KiwiGrip, there wasn't that much area to cover; just the sides in the foot well and the margins, but planning how to actually paint it while maintaining a wet line proved to be a challenge.  I ended up just working from the aft end and moving forward.  It seemed to work out pretty well.

I came back just before dark (about 6 hours later) and did another coat because Interlux Perfection allows for recoats 6-24 hours in between without sanding. I am really done with sanding and will do anything to avoid it.  This morning I came back and did one more again.  Unfortunately, there are a few fisheyes in the paint in pretty visible areas, so I'll probably wait until it dries up hard and then do a little sanding before some final touch ups to complete the job.  In the meantime I have no shortage of other annoying tasks to get the boat ready for launch.


Saturday, May 24, 2014

I Think I Need Some Bigger Sandpaper


I spent the morning curled up in the cockpit with my postage stamp sized 220 grit sandpaper,
prepping for primer.  As I sat there, I saw the irony of me using such a small piece of sandpaper and how long it has taken me to get this boat done.  It really feels like I spent the last 4 years using sandpaper this size to fix the boat.

After my little introspection period I finished the task at hand (sanding of course) by 8:00 AM and put a third coat of primer on just the deck of the cockpit.  I let that dry for a few hours and got another coat down just to build it up.  This should be the final coat before the finish paint, but I'll need to do another round of 220 grit sanding before I start.


I moved on to the seacocks I glassed over yesterday and ground down the hardened laminate flush with the rest of the hull.  It all laid up nicely and there wasn't much in the way of low spots, so I didn't need much filler to make it fair.  At this point I need a quick sanding and then some bottom paint... It's good to go. 

I also spent a little time in the head area to clean up and paint over the closed seacocks.  The section I worked will be covered entirely by the new composting toilet, but I decided to give it a sanding and some paint just to make it look clean (and probably get rid of some smelly old paint).

Finally, it was dump day and I was able fill up 5 trash bags with accumulated debris both inside and outside of the boat.  Sadly, the boat shed doesn't really look any different, I'm not even sure where it all came from. 

Unfortunately, I'll be heading to a funeral in Pennsylvania tomorrow and won't be home until Monday so no work for a few days.  The good news is that it gives me an excuse to swing by Buzzards Bay Yacht Services on the way home to pick up new standing rigging bits and pieces that I ordered and will be making and fitting over the next few weeks.  I haven't done standing rigging before, so this will be a learning experience for me (hopefully a good one).


Friday, May 23, 2014

Goodbye Seacocks

I had planned on getting the cockpit primed and ready for final paint today, but the tiny bit of fairing compound I put on at 5AM decided not to cooperate and still wasn't sandable by 5 this afternoon.  It was raining pretty hard on and off all day and the temperature never really got much above 52, so it's not terribly surprising.  I did put a 100 watt lamp on it, but it just wasn't having any of it.  I suspect the super high humidity hampers the cure time of Quick Fair, or maybe I just didn't add enough hardener in to make it quick in a timely manner.  Oh well, can't win 'em all.

I did make pretty good use of my half day off though, and decided to tackle the last remaining bit of glass work on the boat; the inlet and outlet seacocks for the head.  Back at the beginning of the month I removed the head seacocks and glassed in 5 layers of biaxial cloth in the bevels that I ground from the inside.  I left the outside holes for a later date; today was the later date.

Because grinding bevels is always a nasty mess, I started by tarping the side of the boat where I was going to work and made a mini containment area to keep the dust from getting everywhere.  Once that was set up I went to work with everyone's favorite dust machine, the angle grinder with 36 grit discs.

Before I started, I measured the thickness of the hull at the through hulls and found that it was about 7/8" inch thick.  That's a pretty substantial thickness in itself, but if you take into account the fact that I ground down about 1/2" on the inside to accommodate the 5 layers of cloth I glassed in earlier this month, that is one beefy hull laminate (~1-3/8").

I decided that it wasn't necessary to go crazy with the outside lamination because I had already done 5 on the inside.  I settled on 3 layers on the outside and ground out about a 1/4" deep bevel around the 2 holes.  Since I wasn't going too deep, I still had to contend with the void from the original holes, so after dremeling all the holes and wiping everything down with acetone, I filled them with fairing compound.  Technically, I should have used a structural filler for this, but I'm really low on straight epoxy, but have plenty of fairing compound.  Given that there will be 8 layers total of biaxial cloth when finished, I'm not too worried about the strength of a little fairing compound sandwiched between.


I let that set for a bit so it would firm up and then wet out the three layers of cloth for each seacock hole. I set them all in place smallest first.  I know there is some debate about what is stronger, largest first or smallest first, I don't care.  I like smallest first, it just works for me.  Anyway, once I positioned everything into place I covered it all up with plastic and braced it with cardboard to keep it from sliding off.


Thursday, May 22, 2014

Keep On Keeping On

Still plugging along, working on a bunch of things at once and hoping that it will all come together soon.  Truthfully, I have yet to fully finish a project on the except for the actual re-core of all the decks and cockpit and it's really starting to get to me.  I think in the next few weeks I'll be able to start checking off some of them though, so I have to just keep moving forward.

Over the past few days I've pushed ahead on a bunch of smaller projects that needed to be done, but I'd been putting them off for various reasons (some of them good).  I started by getting 2 coats of Interlux Perfection along the perimeter of the companionway and lazarette hatches when we had nice weather late last week.  Once that had cured, I flipped them over and put a coat of Brightside Polyurethane on the underside of each.  I don't see any point in using very expensive Interlux Perfection on hatch undersides that won't be seen very often and will not be subject to as much UV as the exposed decks would be.  

Because the Interlux Perfection needs several days (4-6) for the paint to fully harden, I set them aside but today I had a little time early this morning so I decided to tape up the companionway hatch and KiwiGrip it.  I decided against doing the hatches for now because I need to mark where to tape them off so it matches the rest of the cockpit.

Anyway, I marked off a 1 inch border around the hatch and taped it all up and cut in radii on the corners.  Once satisfied, I opened up the can of KiwiGrip and pulled the Saran wrap I had laid over the surface when I put it away last (to keep it from drying out).  Then I troweled a bunch on, spread it out and then rolled it around with the KiwiGrip textured roller.  Once it was all rolled out and looking uniform, I pulled the tape and called it done.  Easy, and it cleans up ridiculously fast with no nasty brain damaging smell

At lunch I spent about an hour sanding down more fairing compound that I applied to the scuppers and rudder post after the first coat of primer dried.  I find it hard to get the fairing fully done before I lay down a primer 'scratch coat' so I can see the imperfections better.  I think it is in good shape now and might not need any more fairing compound if I'm lucky.  I'll be up really early tomorrow priming these areas and if it's fair, I'll sand and do one more primer coat late in the afternoon.  If all that works out I could actually get final paint on this weekend.  We'll see....


Tuesday, May 20, 2014

Primed For Launch

Fair, sand, fair, sand, fair, sand.  That was pretty much my mantra over the past few days, and I'm pretty happy it's almost over.  I laid down the first coat of fairing compound 4 days ago using epoxy with Aerosil and glass micro-spheres mixed in.  Unfortunately, the wet weather slowed things down because the epoxy blushed badly which required a solid washing of the deck (and drying) before sanding.  


The weather dried out a bit for the second coat and the blush wasn't nearly as bad, but I still gave it a good wash just to be sure.  For the third coat I used System Three Quick Fair.  I've been using it on and off for several years with good results. It's expensive, but it does sand nicely and dries in as little as 3 hours, so I usually use it for the final fairing coats when there isn't too much more to do.  

I applied this third and probably not final coat this morning at about 5AM.  I decided I'd get up really early and get some boat work done before going into real work.  I ended up working from home from about 10AM on and spent my lunch hour sanding down the last of the high spots.  I was pretty happy with the result and felt it was time to lay down a coat of primer so I could better see any final spots that would need touching up.

After I finished up work for the day, I spent about an hour thoroughly cleaning the entire cockpit, vacuuming, and then wiping everything down with acetone.  I mixed up a batch of primer and went to work.  It's a lot harder painting a cockpit than the foredeck because there are lots of corners and surface levels to work and I found myself struggling a bit to get everything without literally painting myself into a corner. I got it done though and I'm pretty relieved to get to this point.  I gave myself a deadline of May 31st to decide on whether a launch will happen this year.  Getting to this point is a big psychological boost and makes me think it can happen.  I still have 10 days to make the call, but for tomorrow, I'll do some fairing touch ups (mainly around the scuppers and rudder post) and get it ready for the next coat of primer.


Saturday, May 17, 2014

Fair Days

Pun intended.  I've been focusing on fairing both the cockpit and the rudder in my spare time over the past two days.  In the race to get to overall fairness though, the rudder won. Well, one side at least.

After laying up the final big piece of cloth in the cockpit a few days back, I quickly got the first round of fairing compound on, but the weather turned very humid later that day and I found that it caused the epoxy to create a huge amount of amine blush on the surface. At first I thought the epoxy wasn't curing properly, but upon closer inspection, I found that the epoxy had cured and was quite hard, but the blush was thick and waxy, making it seem as if the fairing was still soft and uncured. I googled it, and sure enough, the production of amine blush is related to ambient humidity.

Anyway, this slowed me down a bit, because I had to carefully wash the whole cockpit down without letting water get into the fuel filler port in the middle (the tank is sealed off, but I don't really want to pour water all over it and the engine).  After letting that dry, I sanded the whole deck down, mixed up another batch of fairing compound and troweled it out.  The deck itself was already in good shape, I just have to fill in the 1708 weave pattern, but the edges where it meets the sides of the deck need plenty of smoothing.  That's where I put most of the fairing compound; initially I used a tongue depressor, and ended up using my finger (with gloves).

I had zero time yesterday to get back to the boat but I did put on the second (and maybe final) coat of fairing compound on the rudder.  For the rudder I am using System Three Quick Fair mainly because it's convenient and easy to use.  I plan on using it for the final fairing coat on the deck as well, but I might have to order another quart because I'm using more than I expected for the rudder project.

This afternoon, the humid, rainy weather broke so I took the opportunity to take the rudder outside to sand it all down again (I had done the same thing on the first round of fairing).  I got it to the point where I thought it was fair, but it's hard to tell from touch alone, and the color on the rudder was very irregular from all the work done on it, so I decided I'd put on some epoxy primer to get the color uniform and make it easy to spot high spots.

Once I applied the primer the rudder looked great, but the bolt hole pockets are still showing.  It's minor, but I may put another skim coat on just because it may drive me crazy not having it perfect. We'll see tomorrow once the primer cures and see if it still bugs me.  I really want to be done, but I don't know if I will be annoyed every time the boat comes out of the water and I have to look at it. I know it's anal, but...


Thursday, May 15, 2014

Obsessed

I've spent a lot of time this week working nights to get the cockpit done and I'm happy report that as of 9 PM last night, I officially completed the cockpit lamination schedule.  I still have to fair the deck, but no more big layups.  In fact, I can only think of 3 small spots where I need to cut and laminate any more cloth on the boat (Rudder bolt pocket and two seacock holes when I removed the head).

Last October, just before it got too cold, I had done 2 lamination in the cockpit on everything except the area immediately surrounding the rudder.  Knowing that I had to tie everything together later on, I staggered the lamination so everything would fit back together when I resumed in the spring.

Fast forward to last week: I finally epoxied in the rudder post and fiberglass plate and added the bits of balsa core required to fill in the gaps.  The next step was to tie in the fiberglass plate and rudder tube into the existing lamination I did last October and to bring the height of the plate and balsa up.  It wasn't a large area to do, but I did each lamination separately because I wanted to make sure that there were absolutely no voids here.  This is a good place to do things right.  I weighted each lamination down after laying in with sandbags to get everything flat and avoid bubbles.

Now the entire cockpit sole was at the same height and ready for the final 2 layers.  First I mixed up a batch of epoxy with Aerosil and glass micro-spheres (for easier fairing) and filled in any seams and did some minor leveling.  I let that kick off and then, just to be sure, I added 3 layers of 4 inch (9 ounce) tape to the rudder tube and fiberglass plate.

The third layer is a patchwork of leftovers


The next day I did a quick round of fairing to make sure everything would lay flat for the final layups.  Once that cured, I sanded the whole shebang down before proceeding.  I had mostly run out of my 1708 biaxial cloth, but I had a bunch of 'remnants' lying around so I decided to use those for the third layer.  In retrospect, I should have waited for the new shipment of biaxial cloth to come because it would have saved a bit of work, but I wanted to move forward.

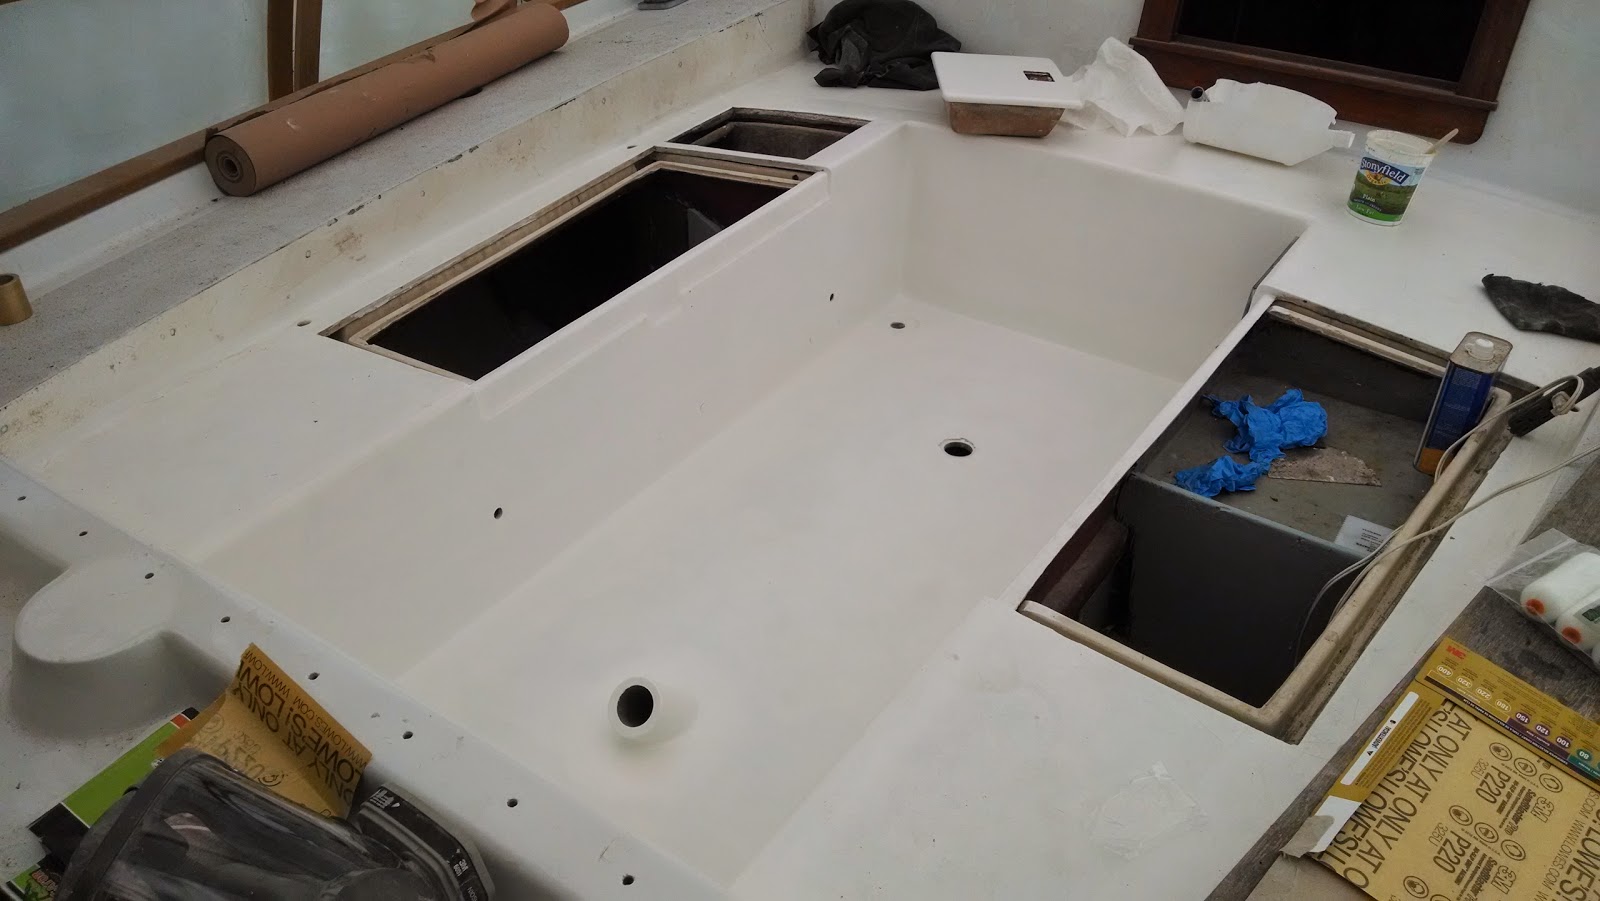
The final piece of cloth

I let that layer harden up and filled in the seams with another batch of Aerosil and micro-spheres.  A final sanding the next day and I was ready for the final layer (FedEx had literally delivered the new roll of cloth 15 minutes before).  I decided that I would do the final layer with one large piece of cloth.  It's a pretty big area, so it was a bit of a challenge even cutting it properly, let alone laminating the whole thing at once.  It was fairly warm and I have fast set epoxy so knowing that this would take a fair amount of epoxy (~30 ounces), I would have to do it in several batches or risk having the pot kick before I could spread it.

I mixed up 16 ounces to start and folded up the big piece halfway toward the aft end of the cockpit.  I normally wet out the cloth before placing it, but this was just Way too big to do so I spread out extra resin with a notched spreader on the forward half of the cockpit before laying the cloth in it and smoothing it out.
I did the same with the aft end, only this time I folded the half forward and put down the epoxy.  I laid that end down and smoothed everything out. The 1708 is very good at being flat so it wasn't too difficult (the same can't be said of 1708 going around curves).  I poured out the remaining 5 or so ounces and spread it out with a flat spreader, paying close attention to getting it into the corners and edges.

I quickly mixed up another 12 ounce batch and poured the whole thing out on the cloth and spread it around evenly.  It took a bit of work, but the final 12 ounce fully covered and saturated all the cloth.  In the past I have 'over-saturated' cloth at times by using too much epoxy, causing it to basically float on the epoxy, but this time it was just perfect.  It figures I'd finally get good at it when I'm about done.  By this time it was 9 PM and I was whipped, so I shut off the lights and went to bed.

This morning I woke up at 5 to check the layup and found that it had hardened up nicely and seemed perfectly flat.  All the 'pre-fairing' I did to level things out and fill seams really paid off.  I mixed up a small batch of Aerosil and micro-spheres to a mayo consistency and spread it out to fill the weave.  I'll need to do a few minor rounds of fairing around the edges where the cockpit sides meet the new cloth and around the scuppers and rudder post, but after that, I am good to go for priming the whole cockpit and moving onto a new project.  All told, there are 4 layers of 1708 biaxial cloth (~1/4") on top of 3/8" balsa and a 3/16" bottom skin.  This cockpit is going to be very stiff.


Sunday, May 11, 2014

Tubed


Waterproofing with modeling clay?
I finally worked up the courage to close up the cockpit once and for all by glassing in the fiberglass plate to the top of the rudder tube and to the surrounding cockpit sole.  I kept putting it off because I felt that once I actually glassed it all up, I wouldn't be able to fix any mistakes I made.  Throughout the whole rudder post alignment process, I never had a really good reference point except for the bottom rudder shoe.  Things could have gone wrong alignment wise with both the rudder and the rudder tube and determining which was off (or both) would have been difficult.  Fortunately, nothing did go wrong in the end although I discovered something odd that could have really caused me to screw the whole thing up had I been paying attention.

I started with checking to make sure the new rudder tube connection to the original was watertight.  I stuffed a bunch of modeling clay into the rudder tube where it enters the boat and filled up the tube with water and let it set for about an hour.  When I returned I was happy to find that the water level was pretty much at the same height although a little seeped out the bottom around the modeling clay.  I took some tissue paper and carefully dabbed around the new rudder tube interface and there wasn't a drop.  I'm going to call it waterproof at this point (with the collar glassed in and 7 layers of 9 ounce cloth, it should be).
See anything amiss?
After that, there were no more excuses for delay so I got to work.  I sanded down the entire fiberglass plate on both sides, then the rudder tube, and finally hit the surrounding cockpit sole that I would tie everything into.  

Next, I cut out balsa core to fill the areaween the new core I did last fall and the fiberglass plate holding the rudder tube.  I followed up by cutting some 1708 biaxial cloth to cover the new balsa sections and the joint where the rudder tube and the fiberglass plate meet.  At this point I took a step back to make sure I had everything in place before I actually mixed up some epoxy.  

As I sat on the bridge deck looking aft I felt a growing horror welling up inside.  It looked like the tube was not centered in the cockpit.  Holy s&*^t, what have I done.  I grabbed the tape measure and sure enough it was off by about an inch to port.  How could that have happened, I was so careful with all my measurements from the rudder shoe; I was just stumped.  I had a plumb line perfectly straight from the center of the rudder shoe pin all the way up through and tied to the rafter in the shed.  It was dead straight.  I went back to the house and started googling 'off-center rudders' and quickly found this article on the Alberg35.org site where another owner was installing wheel steering and found exactly the same off center rudder on his boat.  

Ok, maybe it wasn't me, it was the boat itself.  It could be that that the original mold's keel was slightly out of alignment or that the deck wasn't centered on the hull, or maybe something else.  In any event, there really wasn't anything I could do about it.  The rudder post seemed to be aligned nicely in the tube and what really matters is that the post rotates properly in the tube.  I went forward...

I mixed up 10 ounces of epoxy and thickened it up with Aerosil to make a mayo 'like' consistency.  Using a notched spreader, I spread it evenly on the bottom skin of the cockpit and then did the same on the bottom of the fiberglass plate.  I set the plate in place and smooshed it all together.  Then I spread more out on the bottom of the balsa pieces going in place and smooshed those into the layup followed up with using up the most of the mayo'd epoxy to cover over all the balsa and gaps in between the rudder tube and the new fiberglass plate, the new balsa, and the existing balsa core from last October.  

I used the remainder of the mayo'd epoxy and made a filet around the new rudder tube where it meets the fiberglass plate.  Next, I mixed up a small batch of un-thickened epoxy and wet out the biaxial fabric that I cut for the rudder tube and fiberglass plate.  I maneuvered this into place and took care that the filets mated up with the biaxial cloth.  I covered it all with plastic and a few sandbags and muscled a particularly large rock onto the whole thing to make sure that it all stuck together nicely.  I let it all set up for a few hours until it tacked up and then covered the new balsa with a wet out layer of biaxial cloth.  Time for bed.

The next day I came back for the big test: to test install the bronze bushing I got from McMaster Carr and see if the rudder post rotated in the tube without binding.  Because the bushing is almost, but not quite the inner diameter of the rudder tube, I needed to put a set screw in so it didn't slide down into the tube where I wouldn't be able to retrieve it.  I also wanted the bushing to sit proud of the top of the tube so that if I need to replace it, I will be able to do so by pulling the tiller head and simple grabbing the the top of the bushing with a large pair of pliers and slide it out (that's the theory anyway).  

Once I had the bushing in place I had my wife slowly swing the rudder while I checked how it looked at the bushing/rudder stock interface.  I am happy to say that it rotated as smooth as butter.  We switched spots and I swung the rudder and it felt so very smooth in both directions.  It felt as if there was no friction whatsoever.  I'll probably grease the whole thing up liberally for the final installation and call it a day.  
The only concern I have left is the possibility of stainless steel and bronze dissimilar metal corrosion when in contact.  I'll have to keep an eye on it, but I think that issue occurs when both metals are immersed in salt water.  We'll see, but I'm a happy camper for now except for the off-center thing, but I can't really blame myself for that. 


Even with only one layer of biaxial in place I can tell that this setup is going to be absolutely bombproof.  I can hit the tube hard from all directions and I can't feel even the tiniest amount of deflection.  Unlike the wheel steering that the boat once had, this will inspire confidence.  This upcoming week I still have 2 more layers of biaxial going down in the cockpit to tie the whole thing together, but I think I can knock it off quickly now that warm weather is here. 

It already feels seriously solid


Friday, May 9, 2014

Rudder Tube Installation

I've pretty much finished the rudder except for some fairing that will be needed once it is fully installed because I'll have to glass over the drift bolt hole once the rudder is on the boat for good.  In the meantime, I've been working toward getting the rudder tube installed and glassed in.

Last week I epoxied a 3" outer diameter collar onto the existing 2.5" outer diameter rudder tube that was cut when the wheel was installed back in the 1980's.  I gave it a few days to fully cure and then proceeded to install the rudder and work on aligning the new tube that will slide down and mate with the collar.  

I had my wife down at the rudder and swing it back and forth while I checked that it swung in a nice tight circle.  It didn't; something was off but it was really hard to tell because there wasn't any top bearing to keep the rudder post true.  Ultimately, we were able to get it close enough where I was able to hold the top of the post in my hand (as a bearing) and have my wife swing the rudder from side to side with no play.  I had to keep telling myself that 'It's Going to Be OK' as we were doing it.  I was freaking out a bit because I thought I had made some major error and wasted time and money building a rudder that won't fit.

Once I was satisfied, I shot some Thixo into the new collar and onto old rudder tube where the new one would mate and set the tube with a little bracing to keep it in place.  Early the next morning I came back and added 2 layers of 4 inch wide 9 ounce tape to the seam where the collar and the new tube mate.  That evening I came back and made sure things had tacked up and added 3 more layers with the same 9 ounce tape.  I considered using the thicker 1708 biaxial fabric but I suspect it would have been hard to get it to lay down flat on the curved tube without some sort of vacuum clamping.  In any event, I don't think it's necessary because there won't be any forces exerted on that section of the tube and only needs to keep water out.  All told, I laminated 7 layers of the 9 ounce tape onto the new rudder tube just to make sure it's not going anywhere. 

The top of the tube where it goes through the deck is another story though. It will be subjected to some serious bearing forces and will need to be structurally tied into the entire cockpit and heavily reinforced. Today, I'll start finishing the area by glassing in the fiberglass plate around the rudder tube and cutting the last of my balsa core to fill in the gap in the sole.

Photo taken prior to cutting the new rudder tube to it's final length.