Tuesday, April 27, 2010

Recore Marathon

So I took this week off work with the intent of getting as much done on the recore project as possible.  Not too hot, not too cold, and it's too early for black flies and mosquitoes.  Well, the temps have been good; black flies are getting worse each day.  I think the little bastards know that they can attack as soon as I mix up a batch of epoxy; knowing full well that I can't swat them or I will end up covered in stickiness.

Anyway, I was really happy with my first foray into the recore last week when I laminated up 6 small areas on the cabintop to get used to the process.  However, based on a discussion I had on Plastic Classic forum, I decided not to attempt to layup the core and cloth at the same time.  Tim Lackey reasoned that it was more important to ensure a good bond with the bottom skin than to worry about saving a few hours time.  He also noted that as your layup size gets bigger, so does the difficulty.  Boy was he right.

Late last week I decided it was time to tackle the main cabintop with a large section of core.  First I wet out the inner skin, edges, and each of the pieces of core that I cut and fitted earlier in the week.  Next I mixed up a thickened batch (Aerosil) and troweled it in the gaps between the inner skin and outer skin along the edges.  Time for another batch, this time slathering it onto the inner skin with a notched trowel.  At this point I set each of  the core pieces onto the inner skin and squished it down until the thickened epoxy squeezed out the edges.... Phew...

By now I was sweating like a pig and worried that everything would kick before I got it in place.  Once I got the final piece all set, I mixed up another thickened batch and slathered it over the top of  the core making sure to fill any gaps and kerf lines in the core.  I also partially filled the core-less areas where deck fittings are to be placed later on (so not too much heat builds up; I filled these after first batch kicked).  I finished up by putting bags of sand over the core to keep it everything in place while it cured.

Everything went well, but it was a bit stressful.  First, I was worried some of the bigger batches would kick before I spread them.  Second, I was doing all the mixing myself, so I had a lot of trips up and down the ladder and staging.  I don't think I would have been comfortable adding the cloth step at the same time.  I would have had to fill all the core-less areas immediately, risking too much heat buildup; but mostly, it would have just been way too much at once... I'll leave that to the pros and slow things down a bit.  It's not like I am launching this year anyway.

Saturday,  I tackled the foredecks.  First I spent more time than I'd like taping up thru-deck holes and shoring up the decks from the inside.  This is probably a good time to mention how bad I am at estimating time for projects like this.  I have a bad tendency to only focus on the actual work of doing the recore, I forget to calculate the time spent doing things like taping up holes, shoring up the decks, grinding tapers, cleaning up.  All this adds up to more time than the actual recore work itself.  To  make a long story short, I actually thought that I could cut the foredecks out, grind tapers, sand and prep inner skin, and install the core on all on Saturday.  HAAAAA.


I did manage to get all the foredeck cut out and remove all the balsa.  It was clear even before cutting the skin that the core was in bad shape throughout the entire foredeck area, but when I cut off the top skin, I found that while there were localized areas of rotten core (around stanchions and poorly mounted cleats), there was a lot of good core that had de-bonded from the top skin.  Unfortunately for me, these areas clung tenaciously to the bottom skin. I spent about 2.5 hours using a myriad of power and non-powered tools to get it off.  I knocked off at about 3:30 on Saturday and because of a previous commitment, I couldn't do anything Sunday, so I started back up again this morning and used my mad time estimation skilz to confidently tell my wife that I would be finished with the foredeck core today so we could take the kids to the Museum of Science tomorrow... Oops.  I spent the entire day grinding tapers, sanding and prepping the cabintop where I installed the core last week and cleaning up the foreskin (ha).


I finished by fitting all the balsa that I'll need for tomorrow when I actually install the foredeck core.   By far the majority of time spent today was on the tapers.  This is not a skill that I think I will need that much in the future, but I am getting very good at putting a beveled taper with a 4 inch angle grinder and 24 grit discs.
A few notes on tools used over the past few days:
1.  RIDGID ZRR2611 6" variable speed random orbit sander -  This is the first time I have had the chance to really use it and I am really
 
impressed.  It is quite heavy so it is well suited for gravity assisted applications like this one but I wouldn't want to use it on a wall or overhead.  In addition to variable speed, it has a orbit oscillation adjustment that you can switch from 1/8 to 1/4 inch oscillations.  It also has a real dust port and full cowl around the sanding pad, so when hooked to the vac, it is really dustless.
2.  I have been using my 5" DeWalt 18v cordless circular saw to cut the decks but even though I have 3 batteries, I can only cut so much before I down time waiting for charging.  I got sick of waiting around for this, so I broke out my corded Bosch CS20 7-1/4" circular saw and what a difference (duh, of course)...


I'll still need the DeWalt for tight areas, and the Dremel Multimax for even tighter areas (works great for cutting out stanchion areas), but for long runs, I will be using the big Bosch in the future.


Tuesday, April 20, 2010

Something Sticky

It's a good thing to start building the boat up again (however small) instead of just tearing things down.  Last night I was able to finish cutting out all the biaxial cloth and fine tune each piece so I was ready to go.  Not exactly a CNC job but I tried to waste as little cloth as possible.


Once all the cloth was cut out, I still had plenty of light and warmth (55 or so) so I decided to crack open the epoxy for the first time (other than a test layup) and get started on the first of many layups.  Last weekend I had cut out and setup 3 layers of cloth to fill in the hole where the wood stove chimney used to be here.

I mixed up 2 oz of System Three resin with 1 oz hardener (un-thickened).  I have never used System Three in the past, I have always used West System, but I just couldn't justify the huge price difference, and I have heard good things about System Three.  An added benefit is the 2:1 ratio which makes for easier math than West's standard 5:1 (not that it's rocket science).  Using a 2" chip brush, I put down a coat on the balsa substrate (not core, it is just to hold the laminate in place) and then put the first of 3 layers of glass down.  Saturated that with the chip brush and then repeated with the remaining 2 layers of cloth.  I left it to cure overnight.

I didn't really have a plan for today when I got up, but it was hard to focus at work and I found myself spending way too much time surfing the web on the Plastic Classic Forum and decided that since the weather was so nice that I should cut out of work early and get a head start on the cabintop layup by getting the balsa glued down in the small sections.  Even though these small areas have been a pain because they require a lot more linear area to grind and lots of pieces to cut, they are proving to be a good testing ground for the rest of the project when things get bigger.  If I screw up a section, its not the end of the world in terms of cost and work.  Plus, whatever I can get done and learn this week will certainly help me go faster and more efficiently when I take next week off. 

Anyway, I had everything fairly squared away when I got home from work so I just went to it.  First, I filled up a bunch of bags with dirt to use as weights once everything was setup.  Next, I mixed up an un-thickened 12 oz batch and wet out the inner skin of each area and the scrim side of each balsa core (scrim side down).  At this point I had only used half the batch and had plenty of pot life so I mixed in a cup or so of Aerosil (thixotropic powder) to make it a little thicker than honey and spread it out on the skin of 2 or 3 of the cutout areas and into the corners, then pressed several of the balsa cores in place.  Its cool that when the balsa is pressed in place, the thickened epoxy squishes out the sides and fills the gaps between the core and the rest of the deck area. 

Mixed up a second 12 oz batch and thickened it up to same consistency and filled in all the gaps of the balsa and any areas I missed along the edges and corners.  I also had enough to fill in the areas where hardware will be mounted and all the test holes I had drilled to find the initial bad spots.  Not sure if filling the holes was a good idea at this point (especially with Aerosil because it is a structural filler), but what the hell.


At this point it was probably time to stop so I went and had some dinner but while eating I thought about some advice that I had gotten from one of the crew at Plastic Classic Forum.  He had said that you can do the whole layup in one shot and avoid the blush removal and sanding to make way for the cloth.  He also suggested that you can even mix up the top fairing layer as well, but I figured that was a bit much on the first try and I want to make sure I get the cloth layup correct and want to be able to inspect it once it cures.  Basically, with this method you can save a significant amount of time and labor, and I figured that because these small areas are my testing ground, it would be a good place to see if it works.

So after a turkey burger and fries, I went back out and found that the thickened epoxy was hard but tacky
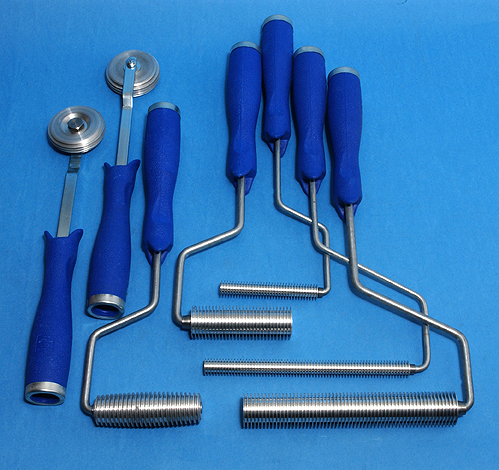
So I pressed in all the inner cloth pieces into place and smoothed them out with my shiny new 3" laminate roller like this.  I mixed up a 6 oz batch un-thickened and wet out the first layer of cloth and the tapered edges of the existing glass.  Another 6oz batch took care of the outer cloth layer and then used the laminate roller to get any trapped air bubbles out of the layup.  I hope at least; the laminate roller seems to work really well, and the cloth makes a satisfying popping sound as the air is forced out of the laminate.  Finally, I put some plastic over each of the layups and weighted them down with the bags of sand I filled earlier (too dark for photos at that point).  Hopefully all's gone well and I'll find a nice layup all in good shape tomorrow. 

Unless I missed a batch (which is possible), I think I used a total of around 40 oz of epoxy today.

Update:  I checked the layup on the way to work this morning having had everything sit overnight for 12 hours and I am really pleased with the outcome.  There doesn't appear to be any voids in the layups, and my plastic bag-o-sand weighting technique worked like a dream (sheet of plastic over layup, followed by big loose bag of sand spread evenly over the entire layup).

Sunday, April 18, 2010

Actually Moving Forward

When I bought all the supplies last week, I felt like I had reached a turning point where I could actually start rebuilding (even though I still have to tear up the decks after I finish the cabintop). I spent the week getting a head start on the recore by setting up the roll of 1708 biax glass for easy access and getting the core cutout and ready to go. I also ordered and received a ridiculously nice (and huge) pair of Wiss Scissors recommended by one of the folks over at Tim Lackey's Plastic Classic Forum. I got them at Bodico.com and I am astounded at how well they cut the biax. No effort whatsoever and perfect clean cuts. Definitely shouldn't run with these.

Joe at Mertons was nice enough to tightly wind the 30 yards of 50" biaxial glass on a big tube so it could be hung and rolled out easily. I decided that the best place for it would be up near where it would be used so I would have to drag it up a ladder every time I needed a piece. So I managed to wrestle it up into the rafters and hang from the bows on an old steel bar I had lying around the yard. Other than humping a 5 foot, 70 pound roll of fiberglass cloth up a ladder and hang it over the bow of the boat, it was reasonably straight forward. It ended up a little crooked, but as long as it rolls smoothly I could care less how it looks.


Next up, I took a roll of carpenters kraft paper and cut out templates for the core and glass parts of each area to be recored. So, once finished I had a numbered template for each core area and each glass area. Since I'll be using 2 layers of 1708, I sized the glass templates for the largest area to be covered and will cut the first piece to that size and the second piece will be approximately 1" smaller in size around the edges.


Once I had all the templates cut, I grabbed a few sheets of balsa core, put them scrim side up and traced each of the core templates onto them with a sharpie marker. Then it was a simple matter of taking a box cutter and following the marked lines. The balsa is really easy to cut but you have to be a bit careful so all the little blocks of balsa don't come unfastened from the scrim while cutting or handling.

I laid all the core pieces in place and made a few cutting adjustments to get all the pieces to fit properly. Finally, I measured the locations of any thru-deck fittings (handholds, hinges, etc...) and cut out areas where they would be going so I can put solid glass plugs in once the core gets glued in.


Last but not least, I had decided last week to simplify things (even further) by removing the chimney vent altogether. Realistically, I have never really needed anything more than a kerosene trawler's lamp to keep warm during my sailing season (May - November) and I just can't justify the added expense and complication of a woodstove.

So I had to rebuild the bottom deck skin where the chimney stack was located. I was able to take a few pieces of the old balsa and wedge it in between the headliner and the bottom skin that was still intact around the chimney stack. Then I cut out two circular layers of biax cloth to fill the gap. I will lay that up with unthickened epoxy and then do the core on top while still green.

Sunday, April 11, 2010

Good Stuff

I finally made the trip down to Mertons Fiberglass Supply in Springfield to pick up supplies (see last post). I had never been to Mertons or knew anyone who had, but after a lot of online searching I found that they (he) had pretty much the best price for both epoxy and balsa core material. What sealed the deal though was that it was reasonably close so I could pick up my order and avoid shipping costs.

I didn't really know what to expect but I assumed that it was probably like any other marine store... Not So. Located in a very industrial section of Springfield, I suspect that Mertons low prices are due (at least in part) to their low overhead costs. The store is nothing more than a very run down warehouse surrounded by junked construction vehicles. There was no sign of a typical marine operation and I was beginning to wonder if I had made a poor choice until I went in and was greeted by Joe (Merton). Joe was really helpful and friendly and very knowledgeable of all things epoxy and fiberglass. It turns out Joe is also 'afflicted' (as he put it) with the boat bug and keeps his boats up in boothbay harbor.

All in all, Joe spent close to an hour with me getting my order together and wrapping everything up for travel in the back of my pickup. If I ever have to do a large restoration project again I will be going back to Mertons. Joe is a good guy and was really helpful.

Back in Canterbury, I unloaded the truck and got to work finishing up grinding the cabintop bevels and sanding the inner skin surface so the new core will sit flat once installed. Pete's suggestion of using 24 grit sanding discs on a flexible grinder backing plate worked out really well. The discs cut way quicker and the edge looked much cleaner than with the standard grinding wheel.

Once that was done, it was time to cleanup the huge mess I created when I started grinding the bevels. When I finished vacuuming up all the dust I felt like I had reached a minor milestone. I finally reached the point where I can start moving forward again and rebuilding instead of destroying. The next few weeks I am going to start cutting and dry fitting the balsa and biax cloth so I'll be ready to go when I take the last week of April off to do the layup.


Tuesday, April 6, 2010

Coming Together

Just a quick update on progress. Lots of planning but I have done little work in the past 3 weeks. I am trying to plan my work out very carefully so I can maximize my time spent doing things that are not necessarily fun. I finally settled on taking the last week of April off work so I can fully focus on the boat for a solid chunk of time. I want to make sure I get all the materials in place and 'tested' prior to that week, so I finally set a date to go down to Merton's and called today to make sure they had everything in stock.

So Friday, I'll be heading down to pick up the following:
15 Gallons System 3 epoxy and medium hardner
30 yards of 50" 1708 biaxial cloth
15 sheets of 2' X 4' x 3/8" balsa core
Cabosil - Amount to be determined
GlassBallons - Amout to be determined

Cost... um, priceless? No, actually not counting the Cabosil or GlassBallons, the total so far comes to $1465 (including Mass sales tax).

Oh, my last post about things that suck... Well, I talked to a friend of mine that is in the boat restoration business (Pete Cassidy of Buzzards Bay Yacht Services) and he told me that grinding the glass with the standard grinding wheel will take forever (it did). He recommended getting a sanding disc attachment and 24 or 36 grit sandpaper. He was right, it made things go much faster. Still sucky, but it didn't last as long. It's nice to learn the hard way.

Thats it for now, more research to do before I finish up my shopping list.

Sunday, March 14, 2010

Things That Suck

I think I have found a something that sucks right up there with cancer, fried liver, and Keanu Reeves acting ability. This sucky something is grinding a scarf joint along the edge of the deck that was removed. This will allow me to be able to lay new layers of cloth down that will mechanically 'tie' the new skin in with the old.

It took a lot longer than I thought (maybe the grinder was dull) and it just throws itchy dust everywhere. The only saving grace was that the old Makita 4" angle grinder works great as always.

An added note was that last night we were supposed to change the clocks and move them forward an hour. I thought my wife had done it and she thought I had done it (neither of us did). To make a long story short, my wife was out for a run and wasn't around so I had to jump in the car to take my daughter down to a birthday party right after finishing grinding. Even with a full face mask respirator and a tyvek suit, I was still covered in itchy dust. I'm sure the other mother's at the dance studio (where the birthday party was) were less than impressed.


Sunday, March 7, 2010

Slow Going

Life has been pretty busy the past few weeks so I haven't gotten anything done (on the boat anyway). About the only thing I have had time to do was to order sandpaper and tyvek suits with hoods to keep the itchy fiberglass dust at bay.

Fortunately I had a few hours to spend today so I got back to the forward cabin top. I had finished up a few weeks back by identifying some of the bad areas (or so I thought). As it turned out, not all were bad. In fact only 2 areas actually had water in the core, but a few of the others I had to pull the core out anyway because when I pulled up the top skin, it yanked half of the core out with it.

I am pretty happy with the lack of work I need to do in this area. I know there will be lots more to do and any time I can save is a good thing.

While I was cutting out the area around the starboard hatch hinge, I kept finding more wet core, so I kept cutting out a larger area to find the extent of the water infiltration. I eventually butted up against the solid core under the mast step that runs the width of the cabin top. It turns out that the water was mostly coming from a wiring chase that straddles the solid deck and the cored area. Two of the pictures show the exposed solid core. It was cool to see what I had sounded and drilled and know for certain that it was exactly what I had thought it was. It's also good to know that I won't have to deal with recoring the step or rebuilding the deck beam. Now I know for certain that these areas are solid (I had previously inspected the deck beam and found that it is oak with a 1/4" steel box beam for added support. I don't know if this is original or not.

Next up is to feather the edges of the mess I have created and get down to Mertons in Springfield to pick up epoxy and core materials. I hope to get down to Springfield in a week or two and then get ready for the 'week of doom' (I'm taking a week off work to focus on the boat sometime in April).